
When you're photographing a birthday party or holiday gift opening, how many times have your guests cursed you for blinding them with your on-camera flash? If your flash is pointed forward, you're blinding your subject and getting nasty, harsh shadows on everything. If you're bouncing your on-camera flash off a ceiling or wall, you inevitably blind another guest while you're straining to get a better angle and forgetting where your flash is pointed. Either way, you'll quickly become a rather unpopular participant at family gatherings.
Fortunately, there is a better way to light a room such that you get more attractive lighting without annoying all the other guests.
I've recently become addicted to the Strobist movement started by David Hobby, which teaches camera lighting techniques using off-camera Speedlights. Strobists typically set their flash power manually rather than relying on TTL or other new-fangled systems that require sophisticated means of communication between the camera body and flashes.
My standard "party lighting" is pretty simple, and can be duplicated with just two off-camera strobes. Basically, I bounce two flashes off the ceiling from opposite directions so that no matter where the subject is located, at least one of the lights will be hitting them. Because both lights are bouncing of the ceiling, nobody gets blinded and all the lighting is nice and soft.
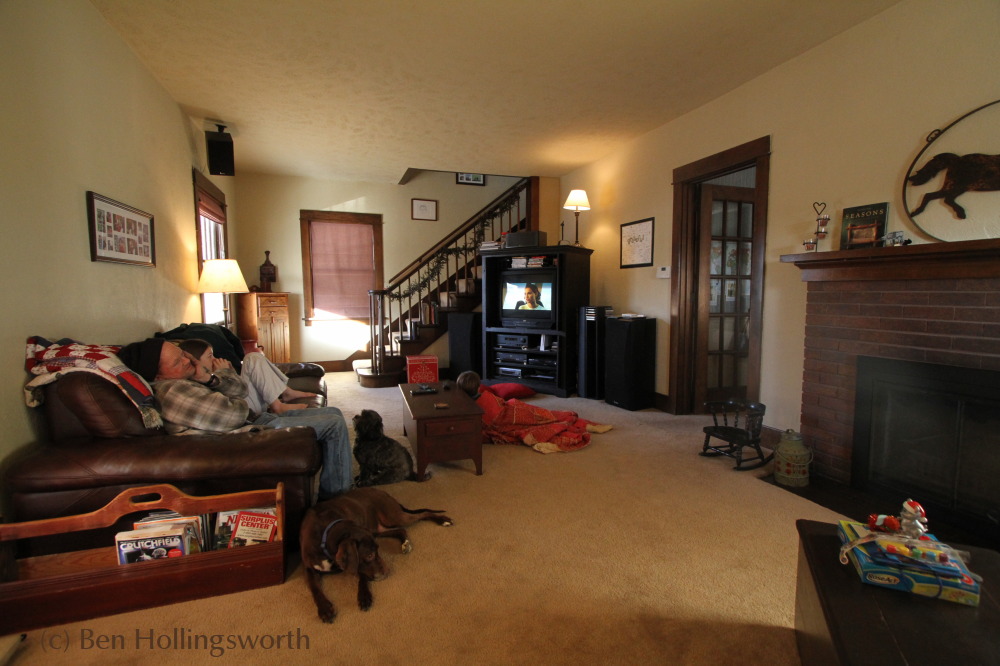
In an average sized, somewhat squarish room, the strobes should be located in opposite corners. If the room is very elongated, you might need a third strobe located near the middle of one wall to help light the center of the room. In that case, the two corner flashes should be located at opposite ends of the same long wall, while the third flash is located near the middle of the opposite long wall. In the example photos ere, there's one flash on a light stand in the corner by the Christmas tree, and another flash sitting atop the entertainment center by the stairs.
 |
| My living room layout at Christmas |
The flashes should be sitting at a height roughly equal to the height of the room's tallest occupant so as to avoid blinding that person while standing. In my family, that's a little over 6' (185cm). If your ceiling is taller than 10' (3 meters), you probably want to locate the flashes as high as possible to save battery power and reduce your recycle times. In my experience, positioning them 3' (1 meter) from the ceiling works well. Inexpensive light stands or tall bookshelves work wonderfully for this.
 The flashes should be angled to point toward the ceiling about one quarter to one third of the way across the room. Zoom the flash head to its widest setting, if possible. This will light up as much of the ceiling as possible, creating a beautiful, soft light over everything in the room (except the ceiling, which will be blown-out white if it sneaks into your shots).
Notice the difference in lighting in the four shots below (viewing the same room from opposite directions). With natural room light, all the lighting is coming from behind the people sitting on the couches. With the flashes bounced off the ceiling, most of the lighting is coming from high in the center of the room so it lights up people's faces rather than their shoulders.
| Natural light | Ceiling bounce flash |
 |  |
 |  |
With new, electronic flashes, you can use Nikon's CLS or Canon's eTTL system to control flash power as necessary. If you're on a budget and are using manual-only radio triggers, you can spend a few minutes before the party dialing in your flash power, knowing that it won't change throughout the event as long as the other room lights don't change. I typically set my flashes (frequently a Vivitar 283 and a beefy Sunpak Auto 544) at about 1/4 or sometimes 1/2 power. This gets me sub-two-second recycle times on full batteries.
Now, when you take a photo with only the flash transmitter on your camera's hot shoe, the entire ceiling will light up to evenly illuminate your subject and the background. Most people don't even notice light coming from that direction. Because there's no flash on your camera, nobody squints when you point your lens at their face.

Color Temperature
 Most family and dining rooms contain either tungsten (incandescent) or fluorescent lights for normal usage. If you light the room with a bare flash (5500K), tungsten lights and anything lit primarily by them will appear very yellow or orange (see the "natural light" photos above). Fluorescent lights will give things a greenish tint, even if they're supposedly 3200K CFL's. Anything lit primarily by your flashes, however, will appear normal.
You can correct this by gelling your flashes to match the room lights, and then setting your camera's white balance to match. That done, the room lights will appear somewhat dim, but still whitish, and all of the room lights and flashes will match. Notice the color of all the incandescent lamps in all of the photos here.
Remember that if the ceiling off which you're bouncing isn't white, then it will have the same effect as adding a gel of that color. Bouncing a flash off a red ceiling will make every shot look like you're in a darkroom. Bouncing off bare, pine paneling is similar to applying a half CTO (about 4000K) gel.
Fill Flash
The one problem with this great overhead light becomes apparent when you're down low and pointing the camera up into the face of a child who's playing or opening a gift. Because all the lighting is coming from above, the subject's face will be mostly in shadow.
 The solution that I've found is to use an on-camera flash to fill in those shadows. This is possible if you're using CLS/eTTL, or if your camera body has a PC sync jack through which to trigger the remote trasmitter. I typically set the on-camera flash (a Canon 430EX) to about 2 stops below the "ideal" power (whatever the camera determines that to be for each shot). This fills in the shadows and gives definition to the dark areas while still allowing the ceiling to provide the soft, primary lighting for the shot. Just remember to gel the on-camera flash the same as your off-camera flashes. In the examples here, pay attention to the downward-facing surfaces, like my niece's face at left. If you look closely, you can see the faint shadow cast by the fill flash.
 The down side of this is that you now have a direct flash (albeit a weak one) hitting your subjects in the face, which may make them react with the old, familiar squint when they see you coming. It all depends on how accustomed your subjects are to flashes and how frequently you expect to be shooting from a low vantage point.
This article was originally written for Jedi.com in January 2011. If you have questions or suggestions, I'd love to hear them. Speak up in the comments section below.
No comments:
Post a Comment
Please leave your comment below. Comments are moderated, so don't be alarmed if your note doesn't appear immediately. Also, please don't use my blog to advertise your own web site unless it's related to the discussion at hand.