 I once ran across a garage sale selling a Nikon FE body (made 1978-84) with a Micro-Nikkor 55mm f/2.8 AIS macro lens attached. This is a highly regarded lens which will reach 1:2 natively and 1:1 with a 27.5mm extension tube. Even wide open, it's "so sharp you can cut yourself just by looking at it." Everybody loves it, except that this design has a chronic problem: oil leaks onto the aperture blades, causing them to stick. The lens I bought had already succumbed to this. I was too ignorant at the time to realize this and try to talk the seller down, but I still only paid $75 for a body/lens that, in working condition, could fetch $175 on eBay. It doesn't take much prodding to convince me to take something apart and fix it.
I enjoy photography, and I love to tinker. I'm a died in the wool engineer, so I love to take things apart and see how they work. I'm also frugal (some would say cheap). Because of this, I've taken an interest in mounting old, high-quality, inexpensive manual lenses on my new digital SLR camera body. I've already collected a couple dozen great, old lenses, some dating back to the 1960's. I'm always on the lookout at garage sales, estate sales, and pawn shops for more good deals on old glass.
Since this Micro-Nikkor's oily aperture blades are such a common problem, I was surprised that there were no detailed instructions available on dismantling this lens, so here you go. Rick Oleson and Seymore from the ManualFocus.org forum were extremely helpful in directing me through this DIY repair. It took me nearly two hours the first time through. By the third time I had to do it, it only took me 30 minutes.
- Tiny Phillips screwdriver
- Really tiny flat-head screwdriver
- Tweezers
- Q-tips
- Isopropyl (rubbing) alcohol or lighter fluid
The repair procedure itself isn't terribly difficult, either. Here it is, step by step with photos:
Note: Be careful not to smudge any of the lenses -- especially the interior ones -- during this process. Use clean hands and tools, and try not to touch any of the glass.
Sit the lens on its nose, mount facing up.
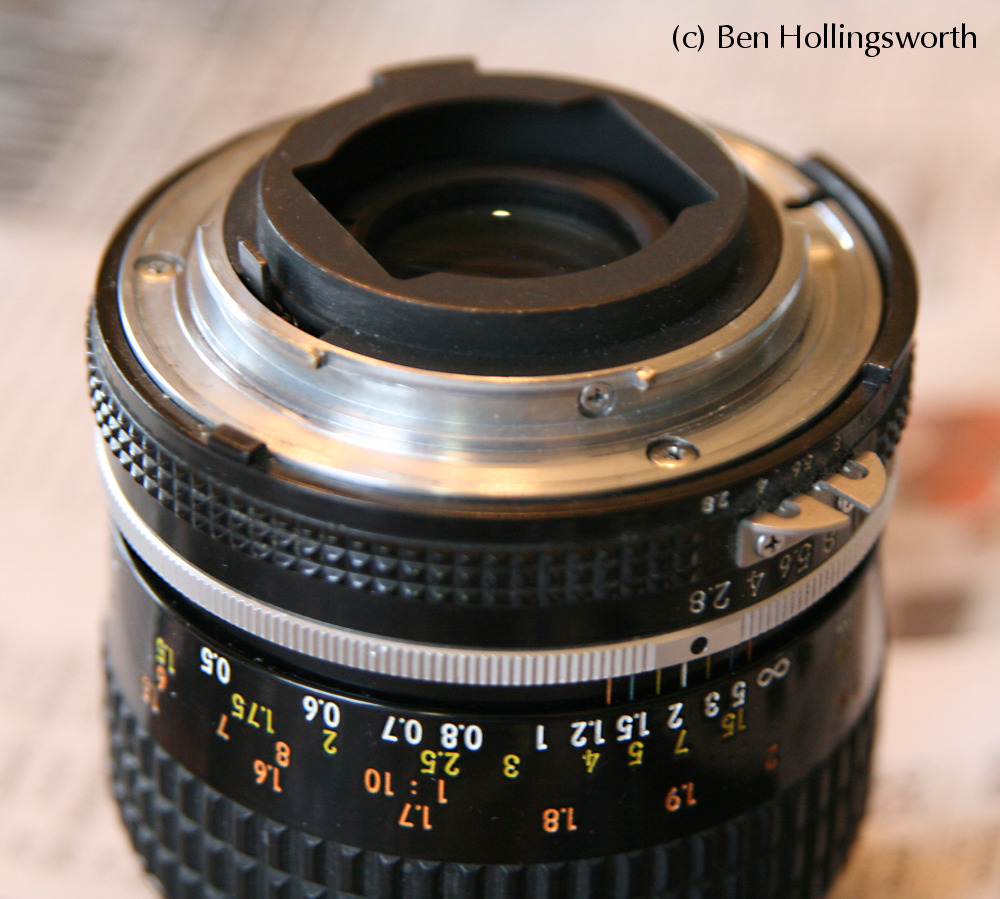
Remove the three visible screws on the lens mount.

Pull the lens mount up and off the rest of the assembly. Set aside the mount.

Remove the three screws from the thick tabs along the outer edge.


Slide the outer body up and off the lens assembly. The aperture lever fits into a slotted track on the body. This track is spring loaded, and can be pushed outward to provide clearance for the lever to come out. Set aside the outer body.


Remove the three rounded screws from the aperture mechanism.

Lift the aperture mechanism off the main lens assembly and set aside the lens assembly.

Remove the spring from the bottom of the aperture mechanism. This is where the really tiny flat-head screwdriver comes in handy. Set aside the spring.

Remove the two flat Phillips screws from the top of the aperture mechanism. Do this while it's sitting on a table, so that the aperture blades don't fall out. Lift off the top half of the mechanism. Clean off any oil you see using Q-tips and alcohol, then set it aside. If alcohol isn't strong enough to do the trick, try using lighter fluid or a petroleum-based degreaser. Avoid turpentine, acetone and paint thinners, as those may remove the paint. Just make sure your work area is sufficiently ventilated for whichever chemical you choose.

Lift off the blade cover plate with the lever and the dog-leg slots in it. Clean off any oil you see using Q-tips and alcohol, then set it aside.


Remove the blades from the lower enclosure by flipping it over and using a pin or tiny screwdriver to push the brass hinge pins out of their holes. Be very careful not to bend the blades as you handle them.


Clean any oil off the lower enclosure using Q-tips and alcohol. Make sure you clean inside the hinge pin holes.

Clean any oil off the aperture blades using Q-tips and alcohol. Use tweezers to handle the blades, and be very careful not to bend any of them. Make sure you clean the hinge pins, too.

Replace the aperture blades inside the lower enclosure. The blades lie so that their tips hook clockwise. The clockwise blade must lie beneath the counter-clockwise blade, so that the CCW blade doesn't hit against the CW blade's hinge pin when you try to open up the aperture. I made that mistake the first time. Make sure that you tuck the final (seventh) blade back underneath the first one.

Now, reverse the disassembly procedure.
Install the blade cover plate with the lever and slots. The brass guide pins on each blade should fit into the slots. Make sure that the blades open and close correctly when you rotate the plate using the lever.


Install the top of the aperture mechanism using the two flat-top screws. There's some wiggle room in the top piece's screw holes. If you can see where the screw heads lined up before, line them up with those marks again. This wiggle room will slightly affect how far the aperture blades open at a given setting.

Install the spring on the bottom of the aperture mechanism. One end of the spring seemed slightly larger than the other, and I put that end around the brass pin. The smaller hook was put around the tab that protrudes from the bottom of the blade cover plate. If you did a good job cleaning, the spring should quickly and easily return the blades to their minimum aperture when at rest. Moving the side lever should open the blades all the way.

Install the aperture mechanism onto the lens assembly using the three rounded screws.
Slide the lens assembly into the outer body. There is a tab on a brass ring near the bottom (front) of the lens assembly that must fit into a groove inside the body's barrel. Press the spring-loaded aperture ring bracket outward in order to slip the lever from the aperture mechanism into the slot. This part gave me lots of trouble until I realized that the slotted bracket was spring loaded.
Secure the outer body using the three screws in the thick mounting tabs.
Move the aperture ring on the body while watching the blades. Verify that they make a perfectly round circle when opened to f/2.8. If not, you can loosen the five inner screws on the aperture mechanism and then use a larger screwdriver or something to rotate the bottom of the aperture mechanism relative to the top of the mechanism.
Install the lens mount and secure it with the remaining three screws.
That's it, you're done! Enjoy your fully functional macro lens. If you want to use it on a Canon EOS, Olympus 4/3, or Micro-4/3 body, try one of these adapters:
And finally, before I go, I want to apologize for the lousy lighting in these pictures. I've learned so much since they were taken several years ago... really.
I originally wrote this article for Jedi.com in June 2008.
For more about how to dismantle camera equipment, check out my instructions for increasing the flash head rotation on a Canon 430EX. More info on Nikkor lens differences can be found in this article. Got a comment or question? I'd love to hear your experiences or answer any questions by leaving a comment below!
I need to clean oil off the aperture mechanism, but I wonder if it is possible to dismantle only as far as the complete aperture mechanism? Having done that, then to dump it into cleaning fluid, agitate, clean with bud, dry and reassemble?
ReplyDeleteI don't feel entirely happy taking out the blades etc., and wonder if doing the above would clean it up sufficiently.
Well, I'd definitely recommend removing the half containing the lens element before you dunked the blade mechanism into a vat of cleaning fluid. I can't say what your fluid of choice might do to the glass coatings, but I'd hate to find out the hard way.
DeleteWith the glass safely out of the way, I suppose dunking the rest of it would work. However, by the time you've dismantled it that far, you've already done virtually all the work. You're not really saving much effort by going your route, and there's a good chance that the remainder of the aperture mechanism will fall apart on its own in your container of cleaning fluid, since the piece containing the lens element is what holds it all together.
Besides, the hard part is not handling the blades. The hard part is getting all the helicoils lined up properly when reassembling the lens. As long as you own a pair of tweezers and you're careful, I don't think there's any reason to avoid handling the individual blades.
I don't think yours is a bad idea; I just don't see any advantage to it. If you decided to try it, please report back & let us know how it worked out.
Hi Ben,
ReplyDeleteThanks for this I've been sending my lens to have it degreased it costs €90.00 a time.
I'll give this a try, many thanks.
Daveruff
Glad I could be of service. Professional CLA's aren't cheap, so it's nice to be able to do this yourself on these simple, manual lenses.
DeleteHi Ben !
ReplyDeleteThanks so much for this lovely DIY article. I just purchased an used 55mm Macro with excellent optics from the U.S. but unfortunately, the aperture is stuck at wide open. I'll follow your steps tomorrow and post my success here !
Shankar
Good luck! I can't wait to hear how it turns out. You'll love that Micro-Nikkor. Of the 30+ lenses I own, it's still one of my favorites.
DeleteThanks to you Ben, I managed to fully dis-assemble and clean the entire aperture assembly. There was lots of oil on the blades. During re-assembly, the tab on the brass ring gave me lots of trouble.....I couldn't align it with the barrel slot. After a few cups of coffee I had a brainwave.....I pushed the tab with a screwdriver anticlockwise and it moved ! (It had somehow got jammed clockwise). Aligning & refitting was easy thereafter. Since the optics were 10/10, I didn't touch the glasses. Took some shots on my D90 body....all I can say is WOW !!
DeleteBen,
ReplyDeleteI am really glad to have found this article online. I brought my Micro-Nikkor 55mm 2.8 that I bought in1986 to Nikon in Mellvile, NY today to get the oil off of the the aperture. They handed it back to me and said sorry parts are no longer available for this lens so they won't service it. I told them that it just needs a cleaning. The reply was we won't do it because if they break something there are no parts. I was gonna dig into it blind but now I have this guideline and that makes me feel better.
Thank you
I'm glad I could be of service. that doesn't surprise me about the factory service center. For future reference, I think a competent, third party lens service center would have been able to clean the lens for you, despite it being retired by the factory.
DeleteEnjoy your lens!
Hi Ben,
DeleteI cleaned my lens and it works fine! I did have one problem right from the start. One of the three visible screws on the lens mount fought me to come out (i have to think there was locktite on it) any way I did get it out but not without damaging the Phillips head of the screw. When I re-assembled I had to file a tiny slot in the head so I can screw it back in. I would like to replace that screw (i am anal that way) for ease of disassembly in the future. I guess I will try to measure the size and pitch of the screw and try to buy one, maybe it's a standard part from Nikon.
Thanks again for this article it really helped.
I know that some lens manufacturers use Loc-tite on some of the internal screws (you can see the red liquid dried around the screw head), but I've never seen evidence that it was used on an exterior screw. However, like you, I have encountered screws that simply refused to budge. I've got a Yashica ML 50/2 lens that I can't fix due to such a screw.
DeleteIf you ever find a source for these tiny screws, please share it here! I'm sure others would benefit from that information. Perhaps model makers, eyeglass repair shops, or watch repair shops could help point you to a source.
Dear Ben, thanks to your great article I was brave enough to take out all the aperture blades and clean'em up. The spring was pretty difficult, and you have to be careful not to let it jump out of the table! The re-alligning of the main barrel was also tricky.
ReplyDeleteBut with your advise I did it, and it now works great!
Thanks again and a salute from the immortal city.
Dave
I hear ya: both the disappearing spring and the barrel alignment gave me fits the first time I did this. I'm glad I could help.
DeleteThanks for this. I was stunned to see such a detailed (free) repair instruction for a lens that I consider(ed) so unique. I've had this lens for about 8 years and I've always thought it was one of my top 5 lenses (out of hundreds over the years). I stack close up filters on this lens (+1,+2,+3) and have shot high detail on ladybugs wings.
ReplyDeleteAnyhow, I'm having a hard/impossible time loosening two of the three screws at the beginning. Oil, heat, precision screwdrivers, eyeglass screwdrivers have all so far proved futile...
Thanks again!
Do you mean the 3 silver screws that are exposed on the lens mount? I've had trouble with lots of lens screws, but not usually those. They're about the largest screws you'll encounter during this process. Did you read jdfern's comments above?
DeleteAs an auto mechanic, my favorite penetrating oil is PB Blaster. It's gobs better than WD-40 or Liquid Wrench. Any of these penetrating oils need time to soak in, so put a few drops around the screw, tap on the lens (the vibrations help work the oil into the threads), and let it sit for several hours. Repeat several times, and then dry off the screw head before using a screwdriver.
I'd be very hesitant to apply heat to a camera lens. If you get it hot enough to make any difference to the screw, you're liable to damage the lens coatings (if not crack the glass itself), and you'll certainly melt away all the grease inside the lens.
Whatever you do, DON'T STRIP THE SCREW HEAD! If you do, your only option is to drill out the screw and then pray you can find a replacement. In that event, try to find a left-handed drill bit so that it'll untwist the screw as it bites into it.
If a standard screwdriver and PB Blaster won't loosen the screw, you might try anchoring the lens in place and then tapping on one side of the screw head with a small chisel, attempting to rotate the screw. This will dig into the screw head and bite better than a screwdriver will. Of course, you'll almost certainly goober up the screw, and if the chisel slips, you'll scratch up the lens surface as well.
I wish I could offer you a more concrete solution. If you get it worked out, please write back to tell us how you did it.
Hey Ben,
ReplyDeleteYes, the three screws. And yeah, I can NOT get these screws off. If I apply any more torque to them they will strip. I am using a precision screwdriver that fits the screw perfectly. I don't own an impact screwdriver. What's weird is one of the (three) screws came out FINE- the other two are stuck. I have tried several methods including tapping on the screwdriver to "loosen" it. I have tried using pliars at a right angle on the top of the screwdriver to get more torque, no deal. I am going to pick up a can of PB Blaster today and pray that it works. I have already slightly stripped the screws so I am not willing to make any more effort without PB Blaster... I looked through my giant box of screws and I have no screws anywhere like the one on this lens, so drilling it out, etc is probably not a wise choice.
Onward. Hopefully the PB Blaster works. I should own a can of it (anyway) so it's a sound investment :)
Ben, I realize that this link is about a year old, but I recently got a Micro Nikkor 55 lens and the focus ring sticks. It is very hard to turn the focus ring and move the barrel. I am fairly new to photography but I really like this lens for close-ups. Would you have any suggestions for cleaning up the focus ring. I have heard that the grease dries out and this causes the issue. Brett
ReplyDeleteYes, you'll want to disassemble the lens, clean all the old grease off the focusing helicals, and then regrease it. Choosing the right grease is a subject of much debate on the Internet. The two following links seem to provide some good information:
Deletehttp://www.fredmiranda.com/forum/topic/810185/0
http://www.personal-view.com/talks/discussion/43/manual-lens-rebuilding/
Thank you. Got it. Works beautifully now. Found that there are two sets of double helix sets in there. One set on the lens unit down inside and one set on the lens unit to lens body. For the longest time I found that I could only get half travel in either direction. Finally I found two paint align marks. I aligned them down in the lens unit and everything seems to work beautifully now. Go figure??? Found it takes pictures great and adjusts very smoothly. I did have to back out one screw used to tighten a brass piece that slides up and down in a slot in the lens unit. Thanks again!!! Brett P.
DeleteThanks for the instructions. I was able to do the cleaning of the blades successfully but after a short time noticed a bit more oil on the blades possibly because I didn't clean the blade pins or the holes for the pins. Is the source of the oil (broken down grease) from the inner portion of the barrel used to extend and retract the lenses for focusing? Is it recommended to relubricate the inner portion if that is what needs lubricant. I've read that silicon based lubricant works well.
ReplyDeleteYes, the oil most likely comes from the grease on the focusing helicals. It might be a good idea to clean that off and regrease it as described in the previous comment above.
DeleteThanks for this terrific guide, Ben -- it has been very helpful, and cleaning the aperture blades went smoothly for me.
ReplyDeleteHowever, I have not been able to get the lens assembly back into the outer body. I seem to be having trouble lining up the tab that goes into the aperture slot AND get the tab on the brass ring into the slot on the outer body. I did managed to figure out a way to do both, but the lens was at full extension and appeared to be jammed such that I could not focus it. I've checked and re-checked the re-assembly steps and cannot see what I might have done wrong. With the lens assembly outside of the body, I can turn the focus ring smoothly with no jamming, so I do not think there is a problem with binding there. This seems to be some type of interference issue between the lens assembly and the outer body.
You mentioned above in a previous comment that "The hard part is getting all the helicoils lined up properly when reassembling the lens." This seems to be the part where I am struggling. Can you elaborate more on that process? Are there any tips for getting things lined up so that the lens assembly will fit into the body.
I've sunk about 5 hours into this repair already, and most of it has been spent struggling with the re-assembly into the body. This is such a great lens for me, so I am hoping that I can still salvage it.
Thanks!
Trev
Does anyone know how to remove the aperture ring? (the ring which starts with the silver ring and goes to the bottom of the lens) I can move one side of the ring but the other is held in on the other side. Somewhere it says to "rotate the ring 90 degrees to remove it" Does it jst take a lot of force to rotate the ring? I am afraid that too much force will break or bend something. Thanks.
ReplyDeleteThank you for this. I cleaned my 55mm f2.8 micro because of a sticking aperture blades by following this guide and it worked perfectly.
ReplyDelete