
Hardware
First, let's talk about gear. You simply can't shoot fireworks without a tripod or some other way to hold your camera perfectly steady for several seconds. A beanbag could work, but they're kind of hard to aim. A tripod allows much more control.
Second, you need to be able to fire the shutter without touching the camera. A remote shutter (either wired, IR, or RF) is perfect for this, since you can choose exactly when to open and close the shutter without causing any vibrations to the camera. Without a remote trigger, your only option is to set the camera on a timer (the shorter the better) and hope that the fireworks start when you expect them to and last as long as you expect them to.
Third, remove any filters that you may have over your lens. It's tempting to use a UV filter for protection during an inherently dangerous event involving pyrotechnics, but lens filters (especially the cheaper ones) tend to cause reflections and ghosting in your shot when shooting bright lights, and you often won't notice it until you upload your photos to a large screen after the evening's festivities have finished.
Fourth, if there are any street lights or other nearby lights that might distract from the fireworks, use a lens hood to prevent these lights from causing flare or other unwanted artifacts on your lens. Essentially, you want to shade the light from hitting the front glass of your lens. If you don't have a hood for your lens, a piece of black construction paper or even your hand will do in a pinch -- just don't touch the lens when the shutter is open!
|

As with any other type of photography, Your choice of lens focal length depends entirely on how close you are to the action. When sitting in the driveway and photographing fireworks that were launched from the street, the wider the lens, the better. 28mm (full frame) or 17mm (1.6x crop sensor) is often not wide enough. When sitting across the lake from a public display, something in the 16-35mm (full frame) or 10-22mm (1.6x crop sensor) range will work pretty well for capturing the entire trail from ground to sky. If you want detail shots within the burst, you may want to go longer than 100mm.
Make sure you've got plenty of fully charged batteries on hand, since long exposures suck battery life on most cameras made in the last 30 years. It also helps to have a very small flashlight on hand so that you can find things in the dark without blinding everybody around you. A red tinted light will be easier on your eyes than a blue or white light. I find that I've always got my face up by the viewfinder, so bringing a chair is just unnecessary baggage.
Technique
As with any photographic subject, it's all about the light. There are different approaches to firework photography, depending on how much ambient light there is in the sky and whether you want to use that light in your photo. Regardless of your method, you'll want to set your camera to manual exposure mode so you can force the shutter and aperture to your choosing. The camera can't auto-expose on a firework blast that hasn't happened yet when you press the shutter.
Remember that dark areas show high-ISO noise better than light areas, and a night sky has lots of dark areas. Consequently, you'll want to use the lowest ISO setting that your shutter+aperture will allow. ISO 400 is about as high as I like to go on my Canon Rebel XTi (400D), but this will depend on your camera body more than anything. If you're shooting film, I'd use ASA 400 as a safe bet.
| ||||||||


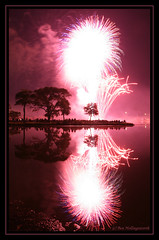
If there's still a little bit of light in the sky that you'd like to use as a backdrop, you'll want to expose for that. If you're using your camera's built-in exposure meter, the sky will probably read one or two stops underexposed. You'll want to set the white balance manually to control the color of the sky. The "daylight" setting (5500K) will probably be pretty close to what you see on a mostly clear sky after sunset. The "fluorescent" setting (4000K) will give the sky a decidedly bluish tint, and the "tungsten/incandescent" setting (3200K) will be bluer still. This bluish tint makes for a more dramatic sky during twilight, but can bugger up any orange or pink tint that may be leftover from sunset, or any people or buildings that you may have included in the frame.
Focusing can be pretty tough with fireworks. Your best bet is to use one or two firework bursts for focusing without trying to take a photo. Set the camera to focus on only one of the focus points (like the center) to make its job easier. Once you get the proper focus distance set right, switch your lens over to manual focus mode (look for an "A/M" switch near the base of the lens) so that the camera won't try to refocus on your next shot. Don't forget to switch it back to auto when the evening is done. Also, remember that your focus point will change if you zoom your lens to a different focal length, so try to pick one length and stay there for a while so you don't have to readjust your focus point.
Because the correct focus distance can be hard to set in the dark, it helps to use a mid-range aperture to allow you a little wiggle room. If you shoot wide open (like f/2.8), and you didn't focus right, all of your firework bursts will be blurry, and that will suck. Shooting at f/5.6 or f/8 will give you a wider depth of field and make an improperly focused shot appear much sharper. Also, smaller apertures (larger numbers) tend to record richer colors than wide open apertures, which is a plus. If you've composed your shot to include other objects that you want to be in focus, you made need an even smaller aperture (wider depth of field) to make both the bursts and the terrestrial subjects appear acceptably sharp.
|
Finally, the shutter speed should be set to include as much of the firework timeline as you desire. This is where a remote shutter control comes in handy, because you can open and close the shutter at will without having to guess ahead of time that the next burst will last for, say, four seconds. Just set your shutter speed to "bulb" mode, which is typically the next stop past 30 seconds..
If you're shooting only the aerial bursts against a dark sky, then your choice of shutter speed will be determined only by how many bursts or how long a trail you want to include in the shot. If there is still a little twilight left, then the longer your shutter stays open, the brighter the sky will be. The same applies if you've included other terrestrial subjects in the frame. If you want to include multiple firework bursts in your shot, but you don't want to overexpose the sky and foreground while waiting between bursts, you can cover your lens between shots with a piece of black paper or foam. Remember not to touch the lens!
Also, pay attention to where in the sky the bursts are located. If a lot of bursts are ending up in the same spot, they'll show up in your photo as a single, white blob. In that case, it's better to capture fewer bursts per frame. If the bursts are more spread out geographically, then you can capture a lot more of them per frame while still retaining good color and definition in each burst. If you've chosen a particular shutter speed that includes what you want, but you find that your firework bursts are blown out (mostly white), you can either decrease your ISO or increase your aperture (larger number, smaller diameter). If the bursts are too faint, go the other direction. Just remember the reasons you chose that ISO and aperture in the first place, and try to find a good balance between the good and bad. Shooting at night often involves compromises in this regard.
Sparklers
|
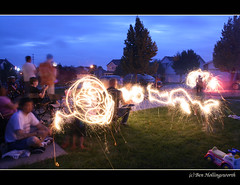
If you spend much time with children on the pyro-lover's holidays, you've probably seen them running around, drawing shapes in the air with color sparklers. These can make for great photographic opportunities. Because sparklers don't cause much commotion, you can even stock up during the holidays and then use them throughout the year (local ordinances permitting) whenever the kids (or kid in you) want to have some fun.
For sparklers, you'll want to use longer shutter speeds than you would for aerial fireworks. Twenty seconds is not uncommon in order to give the kids time to make some fun designs in the air. Because this lets in a lot more light, you may want to compensate by using a narrower (numerically larger) aperture. This has the added advantage of giving your a deeper depth of field so that the sparkler trails of the running children are in focus through more of the shot.
If you're trying to choreograph a shot, remember that the longer a person stays in one place, the more defined their shape will be in the photo. A person who stands perfectly still, moving only their arm and the sparkler, will be clearly visible, and will appear to be lit by the sparkler. A person who is constantly moving will be just a blur, if they're visible at all. If you want to freeze the motion of your subjects during a long exposure, hit them with a handheld flash at some point during the shot. You'll have to set the flash power manually, because the camera won't know how to set it for you. The flash doesn't need to be connected to the camera at all, in fact. This effect will look better if the flash is coming from slightly to one side rather than directly on axis with the camera.
I've found that most sparklers give off an orangish tint, so set your white balance toward the low end of the spectrum, like tungsten or fluorescent. This will be closer to correct for street and incandescent porch lights, too, and will give a rich, blue tint to your sky if there's any twilight remaining.
The settings you use for sparkler photography will vary widely with your individual environment, so it will probably take a little bit of experimenting to get them tuned in.
Hopefully these tips will give you a decent head start to get some awesome firework photos during your next pyrotechnic holiday. If you have any other suggestions or corrections, please speak up in the comments below.
[Update: I wrote another post later on about three different philosophies for photographing fireworks. Read it here.]
This article was originally written for Jedi.com in 2010.
No comments:
Post a Comment
Please leave your comment below. Comments are moderated, so don't be alarmed if your note doesn't appear immediately. Also, please don't use my blog to advertise your own web site unless it's related to the discussion at hand.